Friday 31 July 2015

First Hair Cut

Eeeekkk Archie had this first hair cut today! This was an appointment I have been dreading for a very long time! It's only been this year that his hair started growing and really it needed a cut a few months ago but I was so worried about taking him. Archie has always ran a mile as soon as I get the hair brush out and if on a off chance I'm lucky enough to get near him with it he will have a right fit screaming and messing his hair back up again.
So all week I've browsed the internet for tips on making the appointment go as smoothly as possible and these are the following tips I found and used them with Archie and I was soo happy and relieved when he sat perfect and didn't make a sound :D Very happy mum!
Here is what  done but of course each child is different and other ways may suit you:


  • Opted for a home appointment so he was used to his surroundings
  • All week I've been saying to him about having " big boy hair like daddy"
  • Used his high chair for him to have his hair cut in instead of on my lap ( the original plan )
  • Asked for just a scissor cut instead of clippers as he is quite scared of loud noises like them
  • Gave him a colouring book and pack of crayons
  • Everytime he tried to touch his hair I asked him to play round the garden + tiny turtle on my hands so his little fingers got distracted
  • After we brushed him down I got him a sticker as a reward for sitting so well.
Excuse the pictures aren't very good
Hope some of these tips help you with your child's first hair cut :D 
Please do share some of your tips and stories in the comment box, I would love to hear them xx 

Archie Before                                                                                            Archie After 


Saturday 25 July 2015

Alice In Wonderland Bookcases

When we moved we had this tall black bookshelf which was quite un-slightly in my dining room as the theme for this room was white and sky blue, but we had been given it for free from a house removals and was a shame to just take It down the tip. A few days later I was browsing Pinterest as usual and came across a unit that had been de-coupaged, HOW had I NEVER seen this before!!!! Straight away I knew exactly what to do with my book case. Unfortunately I completely forgot to take a before picture you will soon see I'm terrible for this as I'm so eager to get to work.

Materials

Jigsaw
Undercoat
White gloss
Pva glue I prefer to use this instead of mod podge plus I have tons of it
Paint brush's
Old store card
Sand paper
Varnish
Material of your choice for de - coupaging

1). First I got to work cutting the bookcase in half with a jigsaw and sanded it all down ready to be painted.

2).I then undercoated both half's and glossed just the shelves as I decided to keep these plain.

3). I ordered an old vintage Alice In Wonderland / Through The Looking Glass book which resulted in me sitting by the door like a mad woman waiting for the postman! Once it arrived I got to work pulling all the pages out and neating them up with some scissors, then arranging them on the bookshelf.

4). I got work painting small coats of pva on the unit and on the back of the paper and gently placed it down using an old store card to push all the air bubbles out, then gave one thin coat over the paper ( make sure you don't slop this on as it will either rip the paper or make it wrinkle).

5). Lastly I waited for it all to dry and gave it all a few coats of varnish. I accessorised it with a white Rabbit lamp from Asda for £25, Picture frames from Wilkinsons and some photo albums from Home Bargains for £2.99. I've now got some more blue ornaments and will take another picture to update on here. 

Please leave feedback, all tips are welcome :D 
http://direct.asda.com/george/george-home/george-home-rabbit-lamp/001741623,default,pd.html

Thursday 23 July 2015

Instagram

Hi Everyone I post a lot more on my Instagram of my small day projects and crafts. So if you would like to follow me to get some ideas or even give me some useful tips that would be great

Instagram - Jennyjbxx


Friday 17 July 2015

DIY Play Tent

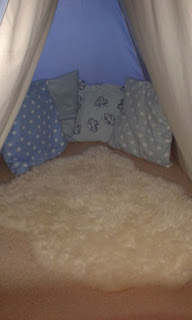
For Christmas I really wanted to get Archie a play tent, but the ones I had seen were well out my price range, So of course I knew I could make one and so I did for less than £20!! As a lot of materials and tools I needed I already had thankfully.
Come Christmas Day after Archie opened his presents I took him to his room, were I set his tent up, and his face lit up! made all the hard work and stressing so worth it!!!


Materials

Battening timber - £8 per pack  - Wickes
White under coat
White gloss
Butterfly bolts
Used sky blue tab top curtains -£5 Ebay
Screws
Saw
Drill Gun
Compressor staple glue
Staples
left over materials from cushions
Measuring tape
Sand paper
Broom handle
Needle and thread
Bed sheet

Time Taken

Approx. a week as again I had to work around my son

1). First I got some timber from my local Wickes and measured them all to equal size and began to saw them down. Once this was done I sanded all the edges down so they were nice and around and there was no sharp edges.

2). Next I drilled out some pilot holes on the ends of the timber ready to drill the screws in without the wood splitting. After they was all connected I choose a point I wanted to 2 pieces of timber at each end to meet to make a cross and drilled this and connected them with a butterfly bolt ( I chose these so they can easily be un-done by an adult and you can collapse the tent to create space again ).

3). I then undercoated the frame and glossed it ( this took a few coats of each ) and cut down a broom handle and painted this as I used this for the top support that the held up the curtains.

4).  I found an old blue bed sheet and pinned it to the back of the frame and measured it all up to cut off any excessive material ready for it to be stapled later on.

5). After that I created  a seem at the bottom of the curtains to thread through the bottom of the frame, which I had to un-done the frame, Very time consuming.

6). Lastly I stapled the back material on and used the left material I had from some pillows I made out of Archie's old blankets to create bows and stapled them on the front of the frame and FINISHED!

Sunday 12 July 2015

Wooden Letters


This is a project I done a few months ago, I found the idea off Pinterest and knew straight away exactly were it would go in Archie's bedroom, Luckily I have a brother who works in a timber yard and am able to get wood for free but if you go to your local timber yard and ask for their off cuts I'm sure you can get some for free or for a very small fee.


 What you need
Wood - Free off cuts from Travis Perkins
Paint - £1 tester pots from wilkinsons
Masking tape - £1
pencil 
Ruler
Jigsaw
Glue gun - £5.99 hobby craft 
Blue ribbon - 50p from knit and sew

Time Taken
This took me a few days as I had to work around my sons nap times but if you have a day free it should take a day giving time for the paint to dry.

1).  Firstly I cut the wood into smaller pieces to make it easier to work with, then drew out the letters on each piece. I had some stencils already printed out so that made it easier. I then drew out different patterns on each letter ( which is VERY time consuming as said before I'm a perfectionist and like every detail to be right to the mm ).


2). Next I masked the patterns off on the letters which again is very time consuming! Then began painting them in baby blue and pebble grey ( this took 3 coats) . I however advise doing the painting after you have cut the letters out as the vice I was holding the wood in left marks over the letters fortunately for me it actually left them with quite a shabby effect but I obviously can't promise that for everyone.

3). I then cut the wooden letters out using a jigsaw and began joining each one to each other using ribbon and a glue gun. I measured each bit of ribbon out equal and glued each one together then created a triangle hook out of the ribbon for the top letter to let it hang. 


Friday 10 July 2015

Picnic Day

July 9th 2015

Today we went on a little adventure and picnic to a beautiful place called Stanwick Lakes, We are very lucky were we live we are close to some great country parks! We decided to walk to day as it was a beautiful day! It's only a 20 minute walk which is great and quite a pretty walk past the lakes and locks which is a bonus as Archie loved seeing the ducks and yes we had to stop for him to say hi to every single one and then bye to what seemed every stone he saw!

Stanwick Lakes is great for families of all ages they have a lovely play area which is full of sand and wooden climbing frames one for more Archie's age, and two more older ages. Archie had an awesome time exploring them all and he even started to join in with the the older school children building sand castles who were there on a trip! This is extremely un-like him as he is sooooo shy he won't even talk to any visitors at our house he will just run and hide! so it was lovely to see him joining in splashing in the little brook that was created in between each play area ( note to self never take him there head to toe in next white clothes big mistake!! there ruined ).

If you choose to you can hire out bikes or boats to go round the lakes, There is an adventure trail with loads of little stops perfect for a rest or picnic and each stop has different activities ranging from bird spotting huts to assault courses and zip wires. 

Here is a link for their website to get more info ... http://www.stanwicklakes.org.uk/northampton/

Have you managed to enjoy these lovely summer days ?  


Here It All Begins

Let me introduce you into my bonkers constant day dream of a life; I started this blog as a get away, a place to share my life, home and ideas with others.

I left home and got my First apartment with my partner when I was 19 years old and that's where my obsession on up-cycling began! As most teens we didn't have a lot of money but also had a shopping list as long as my arm of furniture and accessories to match our modern apartment, so what do you do you up-cycle and create it all yourself and of course I became addicted!

I become a mum when I was 20 in 2013 to my awesome little boy Archie who I didn't realise would quickly become my best friend! Having already been working in a nursery looking after babies I thought I knew exactly what I had to come ... How WRONG was I !!!You don't experience the sleepless nights to last until... well actually they've never stopped, The refusal to eat because there dinner isn't in the right bowl the list goes on however as every mum will agree you will NEVER change a thing! 

Shortly after we moved back to my home town to my dream home ( which took  months of persuading the other half). Karl and my friends couldn't understand how small features such as a door knobs, butler sink, and barn doors could make me love a house so much! But as a perfectionist like me these things made me fall in love and quickly our new house became a home for us three.

Tell me abit about you or share a link of your blog :)